

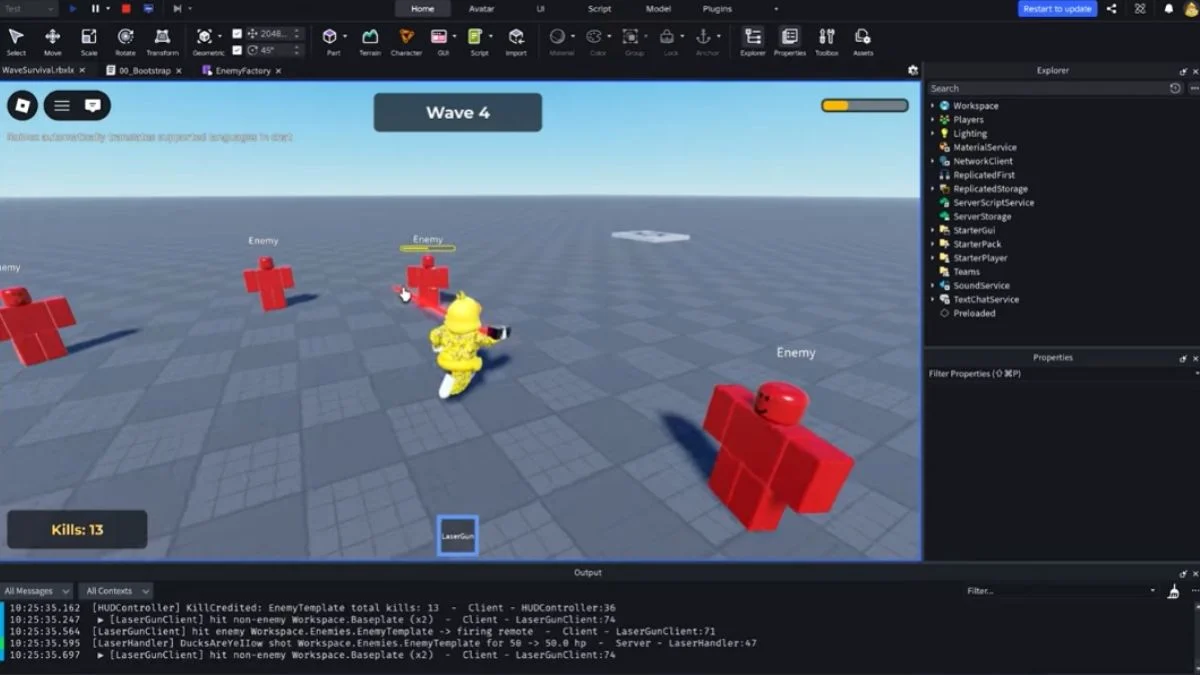
Roblox development just got a serious AI upgrade. Instead of constantly copying Luau code from an AI chat, pasting it into Studio, hitting Play, discovering something exploded, and running back for another fix, creators can now connect Claude directly to an open Roblox Studio session through the built-in Studio MCP server.
That means Claude can move far beyond acting like a normal coding chatbot. Once connected, it can inspect your game’s DataModel, read and edit scripts, create and modify instances, execute Luau, inspect Studio output, capture the viewport, and even run playtests. The workflow is much closer to having an AI development agent inside your Roblox project rather than an assistant sitting outside the game and throwing code suggestions at you.
The entire system is powered by the Model Context Protocol, or MCP, an open standard that lets AI clients communicate with external applications. Roblox has integrated an MCP server directly into Studio, so creators no longer need to install a third-party bridge just to establish a basic Claude-to-Studio connection. As of August 2026, Roblox’s official documentation recommends starting with the built-in server, while community MCP projects remain alternatives for creators looking for specialized debugging, multiplayer testing, or different workflows.
More Game News Still Stacking Up Rewards?: Once Human has its own pile of active redeem codes for Starchrom, crates and more. For more, read our roundup on Once Human Redeem Codes.
What Is Roblox Studio MCP?
MCP stands for Model Context Protocol, and inside Roblox Studio, it acts as the communication layer between an MCP-compatible AI client and the Studio session currently open on your computer.
The official Studio MCP server runs locally and communicates with the AI client through the standard input/output, or stdio, transport. The AI client sends requests through that connection, and Studio performs the corresponding actions inside the active development environment.
Roblox’s current MCP implementation covers several major areas of game development.
For scripting, Claude can read scripts, search for scripts, search across source code, and apply multiple edits. The multi-edit functionality can also create a script when the requested script does not already exist.
For DataModel work, the AI can explore your game’s instance hierarchy and inspect individual instances, including readable properties, attributes, and children.
For Luau development, Claude can execute code in Edit, Client, or Server contexts.
The system also includes playtesting tools. An MCP client can check Studio’s current state, start or stop playtesting, retrieve console output, and capture the Studio viewport. Roblox’s current toolset also includes character navigation and simulated keyboard and mouse input.
And the built-in server has moved beyond basic script editing. Roblox currently lists tools for searching and inserting Creator Store assets, generating meshes and materials, generating procedural models, accessing Roblox documentation, and using specialized skills.
So yeah, this is the big shift: Claude can operate much closer to an actual Roblox development agent instead of functioning like a conventional chatbot that only gives you code to paste manually.
Another Guide Worth Checking Building a Deviant Roster?: Once Human’s Deviations system has its own capture spots and build strategies worth knowing. For more, read our story on the Once Human Deviations Guide.
What You Need Before Connecting Claude to Roblox Studio
The setup itself is surprisingly straightforward.
You need:
- The latest version of Roblox Studio
- Claude Desktop or Claude Code
- A Roblox place open in Studio
- An MCP-compatible connection between Claude and Studio
Roblox’s current documentation specifically lists Claude Desktop and Claude Code among the clients supported by its Quick Connect system.
Other supported clients include:
- Antigravity
- Codex CLI
- Cursor
- Gemini CLI
- Visual Studio Code
For the official setup, you do not need a community Roblox MCP plugin.
More Game News Stuck on a Lockbox?: Once Human’s High Banks quest hides its passcode behind a puzzle players keep getting stuck on. For more, read our post on Once Human’s Boy Just Wanna Have Fun Quest Guide.
How to Enable the Official Roblox Studio MCP Server
Start by opening Roblox Studio and loading the place you want Claude to work on.
Once the place is open, open Assistant inside Studio.
Then navigate to:
Assistant → … → Manage MCP Servers
You will see an option called:
Enable Studio as MCP server
Turn it on.
Studio will then display connection options and setup instructions for MCP-compatible AI clients.
Once a client connects successfully, Roblox displays a green indicator showing the number of connected clients.
That green indicator is one of the easiest ways to confirm that the Studio side of the connection is working correctly.
Squad Up With More Guides Picking a Specialization?: Star Wars Zero Company gives you 12 classes to build a squad around, and picking the right one matters. For more, read our breakdown of every Star Wars Zero Company Class.
Connect Claude Desktop Using Quick Connect
For Claude Desktop users, Roblox’s current Quick Connect system makes the setup much easier than manually creating an MCP configuration.
After enabling the Studio MCP server:
- Open Assistant.
- Click ….
- Select Manage MCP Servers.
- Open the Quick connect section.
- Find Claude Desktop.
- Turn the connection on.
- Restart Claude Desktop when required.
Roblox says Quick Connect automatically displays supported clients installed on your computer.
When Claude Desktop does not appear in the list, make sure the application is installed and restart Roblox Studio. Roblox specifically recommends restarting Studio when a supported client fails to appear in the Quick Connect section.
Once Claude connects, head back to:
Assistant → … → Manage MCP Servers
Check for the green connected-client indicator to confirm the connection.
More Game News Chasing a Battery Casing?: Fisch’s mine shaft progression trips up plenty of players trying to reach Vega. For more, read our guide on Roblox Fisch’s Battery Casings and Mine Shaft.
Connect Claude Desktop Manually With JSON
Quick Connect is the easiest route, but Roblox also provides a manual MCP configuration for creators who prefer configuring the connection themselves.
For Windows, the current Roblox configuration uses:
{
“mcpServers”: {
“Roblox_Studio”: {
“command”: “cmd.exe”,
“args”: [
“/c”,
“%LOCALAPPDATA%\\Roblox\\mcp.bat”
]
}
}
}
On macOS, the official configuration points directly to the Studio MCP executable:
{
“mcpServers”: {
“Roblox_Studio”: {
“command”: “/Applications/RobloxStudio.app/Contents/MacOS/StudioMCP”
}
}
}
Creators who already have other MCP servers configured should not replace the entire configuration file. Add the Roblox Studio entry to the existing mcpServers object and separate entries correctly with commas.
A malformed JSON file can stop the MCP client from loading its configuration entirely, so double-check commas, brackets, quotation marks, and the overall structure.
Connect Claude Code to Roblox Studio
Claude Code offers a terminal-based workflow for developers who prefer working outside the main Studio interface.
Roblox’s current Studio MCP server supports Claude Code through Quick Connect, MCP configuration, and CLI options.
The key thing to remember is that the official Studio MCP connection does not require the community @chrrxs/robloxstudio-mcp package.
When Roblox Studio provides a CLI command in the MCP setup panel, use the command shown there for your specific operating system and Studio installation.
Roblox’s current documentation lists these underlying commands:
Windows
cmd.exe /c %LOCALAPPDATA%\Roblox\mcp.bat
macOS
/Applications/RobloxStudio.app/Contents/MacOS/StudioMCP
Claude Code can register MCP servers from the command line through its claude mcp command.
The safest approach is to follow the command Roblox Studio currently displays inside its Setup Instructions section instead of relying on an older community tutorial.
After registering the server, restart Claude Code and verify the connection through Studio’s MCP settings.
Loot You Might Have Missed Codes for Override Mode?: Fortnite’s admin panel comes loaded with lobby hacks and free rewards for the current season. For more, read our list of Fortnite Admin Panel Codes.
Why Older Claude-to-Roblox Tutorials Can Get Confusing
This is where a lot of Roblox creators can accidentally end up doing way more setup than necessary.
Many older tutorials were created before Roblox’s current native MCP implementation existed.
Some guides tell creators to:
- Install a Studio plugin
- Start a separate Node.js server
- Configure Claude to communicate with a third-party bridge
- Use HTTP endpoints
- Install older Studio MCP binaries
Those workflows can still be useful, but they are not the same as Roblox’s current built-in MCP server.
The official Roblox server is now integrated directly into Studio.
That means a recent setup should begin with:
Assistant → Manage MCP Servers → Enable Studio as MCP server
There is no need to immediately start hunting for a third-party bridge.
This distinction matters because community MCP projects can change their installation procedures, available tools, package requirements, and security settings independently of Roblox Studio.
What Claude Can Do After Connecting to Roblox Studio
This is where Studio MCP starts getting seriously interesting.
The official server gives Claude access to development capabilities that go far beyond simply generating Luau snippets.
Quests You May Have Missed Timed Rewards Slipping By?: Pokémon Pokopia has a workaround for grabbing limited-time Pokémon after their events technically end. For more, read our explainer on the Pokémon Pokopia Missed Event Trick.
Claude Can Inspect the DataModel
Claude can explore the hierarchy of your Roblox place and inspect individual instances.
For example, it can inspect areas such as:
- Workspace
- ReplicatedStorage
- ServerScriptService
- StarterGui
- StarterPlayer
- Specific folders
- Scripts
- Parts
- RemoteEvents
- UI objects
It can also inspect properties, attributes, and child objects to understand how your project is structured.
That means you can ask Claude to look at the actual game architecture instead of manually explaining every folder and object before asking for help.
Claude Can Read and Modify Scripts
The official MCP server includes tools for reading scripts and applying edits.
Claude can inspect an existing ModuleScript, identify a problem, modify the relevant code, and continue working with the updated project.
The scripting tools also include search capabilities, allowing Claude to find scripts by name or search for a specific string across the game’s source code.
Forge Ahead With More Guides Smelting Got You Stuck?: Mortal Shell 2’s Tarforge system hides a lot behind Tarstone levels and the Endless Core. For more, read our full walkthrough on the Mortal Shell 2 Tarforge Upgrade Guide.
Claude Can Create Scripts
The MCP server’s multi-edit functionality can create a new script when the requested target path does not already exist.
This makes it possible to give Claude an actual development task instead of merely asking for a code snippet.
For example:
Create a server script under ServerScriptService that manages the round timer and displays the remaining time through a RemoteEvent.
Claude can inspect the existing project structure before deciding where the new script belongs.
Claude Can Create and Modify Objects
MCP allows AI clients to interact with the Roblox DataModel rather than being limited to text files.
Depending on the available tools and requested task, Claude can work with:
- Parts
- Folders
- Scripts
- UI elements
- Other instances
This is one of the biggest differences between a normal AI coding assistant and a Studio-connected development agent.
Claude Can Run Luau
Roblox’s official MCP server includes:
execute_luau
The tool can execute Luau in multiple DataModel contexts, including:
- Edit
- Client
- Server
That allows Claude to perform certain operations directly inside Studio and use returned results or errors as additional development context.
Claude Can Run Playtests
The MCP server also includes Studio playtesting controls.
Claude can:
- Check Studio’s current state
- Start playtesting
- Stop playtesting
- Retrieve console output
- Capture the Studio viewport
This creates a much more powerful iterative workflow:
inspect → modify → run → observe → fix → test again
That is a huge upgrade over the old workflow of generating a script and leaving the developer to figure out whether it actually works.
Walk This Way for More Guides Hunting the True Ending?: Big Walk hides its White Key and Big Game achievement behind a few easy-to-miss steps. For more, read our full breakdown on the Big Walk All Endings Guide.
Claude Can Also Work With Screenshots and Simulated Input
Roblox’s current MCP tools go beyond code and DataModel manipulation.
The official server includes a screen capture tool that can capture the current Studio viewport, with optional camera positioning.
It also includes tools for:
- Character navigation
- Simulated keyboard input
- Simulated mouse input
This means an AI agent can potentially inspect what the game looks like during development and interact with the running experience as part of a testing workflow.
That becomes especially useful for UI problems and playtest verification.
A script can technically work perfectly while the actual game still looks wrong or behaves incorrectly. Screenshots, viewport inspection, and simulated input can help reveal those issues.
Roblox’s August 2026 MCP Update Is a Big Deal
The Studio MCP system received a notable update in August 2026.
Roblox announced improvements to multi-agent and multi-Studio workflows, changing how MCP tools identify the Studio instance they should operate on.
Previously, agents could rely on a single active Studio instance through the set_active_studio mechanism.
Roblox changed the routing model so MCP tools explicitly use a studio_id.
The goal is to make workflows involving multiple AI agents, multiple MCP clients, and multiple Studio windows more reliable.
Roblox also said the update fixed an issue where the MCP server could return:
“method not implemented”
for valid tool calls when parts of the server lost their connection.
Another fix addressed the MCP server disabling itself, which had caused connected Studio instances to disappear from AI clients.
For creators experimenting with multiple Claude sessions or several Studio windows, these August 2026 improvements are especially important.
More Game News Need the Dive Location?: Pokopia’s Bubbly Basin DLC has its own entrance requirements that trip up first-time visitors. For more, read our access guide on Unlocking Bubbly Basin in Pokémon Pokopia.
Using Several Roblox Studio Windows
The current Studio MCP server can connect a single MCP client to multiple running Studio instances.
Roblox says the server can determine which Studio instance to use based on context, such as a referenced game or object that exists only in one particular instance.
Creators can also manually manage the active Studio instance through MCP tools such as:
- list_roblox_studios
- set_active_studio
This becomes useful when working on several places simultaneously.
For example, one Studio window might contain a development branch while another contains a separate prototype.
Explicit Studio identification helps reduce the risk of sending an instruction to the wrong session.
Creators should still be careful when allowing an AI agent to edit multiple open projects.
What About Community Roblox MCP Servers?
The official server should be the first choice for most creators, but community MCP projects are still an important part of the Roblox AI development ecosystem.
These projects can provide functionality that differs from Roblox’s native implementation, including:
- Specialized debugging
- Multiplayer testing
- Screenshots
- Runtime evaluation
- Automated development workflows
One notable example is Chrrxs/robloxstudio-mcp, an open-source MCP server focused on runtime debugging and automated Studio workflows.
Its current project documentation advertises tools for:
- Live server Luau evaluation
- Live client Luau evaluation
- Log breakpoints
- Runtime logs
- Playtest automation
- Screenshots
- Multiplayer testing
- Roblox documentation lookup
The project currently provides a Claude Code installation command using:
claude mcp add robloxstudio — npx -y @chrrxs/robloxstudio-mcp@latest –auto-install-plugin
That is a community alternative, not the command required for Roblox’s built-in Studio MCP server.
Creators using this route should follow the project’s current installation instructions because its package and plugin requirements can change independently of Roblox Studio.
Another Community Option: Claude Roblox Bridge
Another project, Point58/Claude-code-roblox-mcp, describes itself as a bridge between Claude Code and Roblox Studio.
Its Windows installer is designed to handle:
- The bridge
- The Studio plugin
- Claude Code registration
According to its project documentation, the bridge allows Claude to:
- Read the DataModel
- Edit scripts
- Build HUDs
- Run Luau in Studio
This can be useful for creators who specifically want a packaged Windows workflow instead of manually configuring an MCP server.
Once again, though, this is an alternative implementation.
You do not need it simply to connect Claude to Roblox’s current official Studio MCP server.
One Last Stop Before You Go Looking for a Rare Doll?: Pokopia’s Starmie Doll quest ties into the Frillish line and unlocks Dream Island rewards along the way. For more, read our location guide on the Pokémon Pokopia Starmie Doll.
Community MCP Servers Can Require Extra Permissions
Third-party MCP implementations can require additional Roblox Studio settings.
For example, the current Chrrxs server instructs users to enable:
Game Settings → Security → Allow HTTP Requests
before using its Studio plugin.
That requirement comes from the community bridge and should not be confused with a prerequisite for Roblox’s native MCP server.
The same distinction applies to requirements such as:
- Plugin installation
- Node.js packages
- npm commands
- Authentication tokens
- Other third-party setup steps
For the official Roblox server, follow Roblox’s own MCP setup instructions first.
For a community bridge, follow that project’s installation and security requirements separately.
What About Rojo and CLAUDE.md?
MCP is not the only way to combine Claude with Roblox development.
A file-based workflow can use Rojo to synchronize a local Roblox project with Studio.
In that setup, your Luau code exists as files on your computer rather than being edited directly inside the Studio DataModel by the AI.
A CLAUDE.md file can provide Claude with project-specific context, including:
- The project’s Luau conventions
- Folder structure
- Server/client organization
- Naming conventions
- Module architecture
- Testing instructions
- Important project rules
Rojo then synchronizes those local files with Roblox Studio.
This approach can be useful for projects already centered around source control and text-based project files.
The difference between the two workflows is important:
Rojo + Claude is primarily a file-based development workflow.
Studio MCP + Claude gives the AI direct access to the active Studio environment.
The two approaches can also complement each other.
Which Claude-to-Roblox Method Should You Use?
For most Roblox creators in August 2026, the decision is fairly straightforward.
Use the Official Studio MCP Server When…
You want the simplest and most direct connection between Claude and Roblox Studio.
It is the recommended starting point because the server is built directly into Studio and Roblox provides the official setup instructions.
It is also the strongest option for creators who want Claude to inspect the DataModel, edit scripts, execute Luau, and perform playtests without maintaining a separate bridge.
Use a Community MCP Server When…
You need specialized functionality that the official server does not provide or you prefer a specific development workflow.
Community implementations can offer tools for specialized runtime debugging, multiplayer automation, screenshots, breakpoints, and other workflows.
Before installing one, check the project’s repository, permissions, and current installation instructions.
Use Rojo When…
Your project is already organized as a local, source-controlled codebase and you prefer Claude to edit files rather than directly manipulate the Studio DataModel.
This can provide a cleaner workflow for teams already using Git and structured Luau projects.
How to Test Your Claude and Roblox Studio Connection
Do not start by giving Claude permission to rebuild your entire game.
Begin with a harmless inspection task.
For example:
Inspect the DataModel and tell me what objects exist inside ServerScriptService. Do not make any changes.
When Claude returns the correct hierarchy, the connection is working.
Next, try a small read-only request:
Find the ModuleScripts inside ReplicatedStorage and list their names without modifying anything.
Then test a controlled modification:
Create an anchored Part named MCPTestPart at position 0, 10, 0. Do not modify anything else.
Open Studio and verify the result manually.
After that, you can ask Claude to remove the test object.
This staged approach is much safer than immediately giving an AI agent broad control over a production place.
Example Prompts to Use With Claude
Once the connection is working, precise instructions generally produce better results.
Instead of saying:
Make my game better.
Try something with a clear scope:
Inspect ServerScriptService and ReplicatedStorage. Identify the script responsible for the round system and explain how it currently works. Do not modify anything.
For building:
Create a red Part named TestPart at position 0, 10, 0. Set its size to 4, 1, 4 and Anchor it. Do not modify existing objects.
For debugging:
Run a playtest, inspect the Output log for errors related to RoundManager, identify the likely cause, and show me the proposed fix before editing the script.
For UI:
Inspect StarterGui and find the existing HUD. Add a TextLabel that displays the current round number without changing the existing layout.
The more specific your scope, location, and expected result, the easier it becomes for an AI agent to complete the task without making unrelated changes.
Keep Control Over AI-Generated Changes
MCP gives Claude considerably more power than a normal chat window because it can interact with your actual development environment.
That also means mistakes can have real consequences.
Roblox warns creators to connect only clients they trust because MCP clients can read and modify content inside open Roblox places.
Before allowing major changes:
- Save or publish a known-good version.
- Work in a development copy instead of your production place.
- Ask Claude to inspect before editing.
- Keep requests narrowly scoped.
- Review generated Luau.
- Test changes before publishing.
- Avoid giving unnecessary access to unrelated MCP servers.
- Be particularly careful when multiple Studio instances are open.
The goal is to make Claude an effective development agent, not hand over unchecked control of your entire project.
Troubleshooting Claude and Roblox Studio MCP
When Claude cannot see the Roblox tools or the connection is behaving strangely, start with the basics.
Restart Both Applications
Roblox recommends restarting both Studio and the MCP client when the connection does not appear correctly.
Check the Green Indicator
Go to:
Assistant → … → Manage MCP Servers
Check whether Studio displays the connected-client indicator.
Check the MCP Command
For manual configurations, verify that the command or executable path actually exists.
On Windows, make sure the Roblox MCP batch file is available at the path used in your configuration.
Check Your JSON Syntax
A missing comma, bracket, or quotation mark can prevent an MCP configuration from loading.
Check for Multiple Studio Instances
When several Studio windows are open, make sure Claude is operating on the intended instance.
The current MCP implementation includes tools for listing connected Studios and explicitly selecting one.
Update Claude and Roblox Studio
Roblox continues to update Studio MCP, and the August 2026 release specifically addressed connection stability and multi-agent routing.
When an older tutorial stops working, check Roblox’s current documentation before reinstalling third-party components.
Final Verdict: Studio MCP Changes the Claude and Roblox Workflow
Connecting Claude to Roblox Studio is now significantly easier than it was when creators depended on community-built bridges.
The official Roblox Studio MCP server is built directly into Studio, supports Claude Desktop and Claude Code, and can give an MCP-compatible AI client access to the DataModel, scripts, Luau execution, playtesting, console output, screenshots, input simulation, and other development tools.
For most creators, the best route is:
Update Roblox Studio → Assistant → Manage MCP Servers → Enable Studio as MCP server → Quick Connect Claude Desktop or Claude Code → Verify the green connection indicator
Community MCP servers such as Chrrxs/robloxstudio-mcp and Point58/Claude-code-roblox-mcp remain useful for creators who specifically need their additional capabilities, but they should be viewed as alternatives rather than mandatory parts of the Claude setup.
The August 2026 MCP improvements also make the system more practical for serious development. Roblox has moved toward explicit Studio identification for multi-agent workflows and fixed connection problems that previously caused valid MCP calls to fail or caused the server to disable itself.
For creators who want Claude to do more than suggest Luau code, Studio MCP is the key difference.
Instead of asking an AI what code to paste into Roblox, you can give it a controlled task, let it inspect the project, make the change, run a test, and help verify the result.
That is the real power move here: Claude stops being a chatbot sitting beside Roblox Studio and becomes an AI agent capable of working directly with your active development environment.
Sources
- Roblox Creator Hub — Connect to the Roblox Studio MCP server
- Roblox Creator Hub — Build with a coding harness (MCP)
- Roblox Developer Forum — Studio MCP: Multi-Agent Improvements and Connected AI Clients (Aug 2026)
- Roblox Developer Forum — Introducing the Open Source Studio MCP Server (historical)
- GitHub — Roblox/studio-rust-mcp-server (archived standalone server)
- GitHub — Chrrxs/robloxstudio-mcp
- GitHub — Point58/Claude-code-roblox-mcp
Featured Image Credit: Roblox Learn (via YouTube)


Leave a Reply