
In Silent Hill f, fear doesn’t always come from what hunts you in the dark; sometimes, it’s born from what the light reveals. Among the game’s many unsettling puzzles, the Light Puzzle in the Worship Hall stands out as both a mechanical and symbolic trial. It’s here that Hinako confronts reflections of memory, guilt, and ritual, all illuminated, quite literally, by the shifting gaze of two statues: the Fox and the Rabbit.
This guide will take you through how to complete the Light Puzzle in Silent Hill f, offering precise solutions for every difficulty level, detailed location notes, and thoughtful insights into its meaning within the game’s world.
In This Post
Overview: The Light Puzzle in Silent Hill f
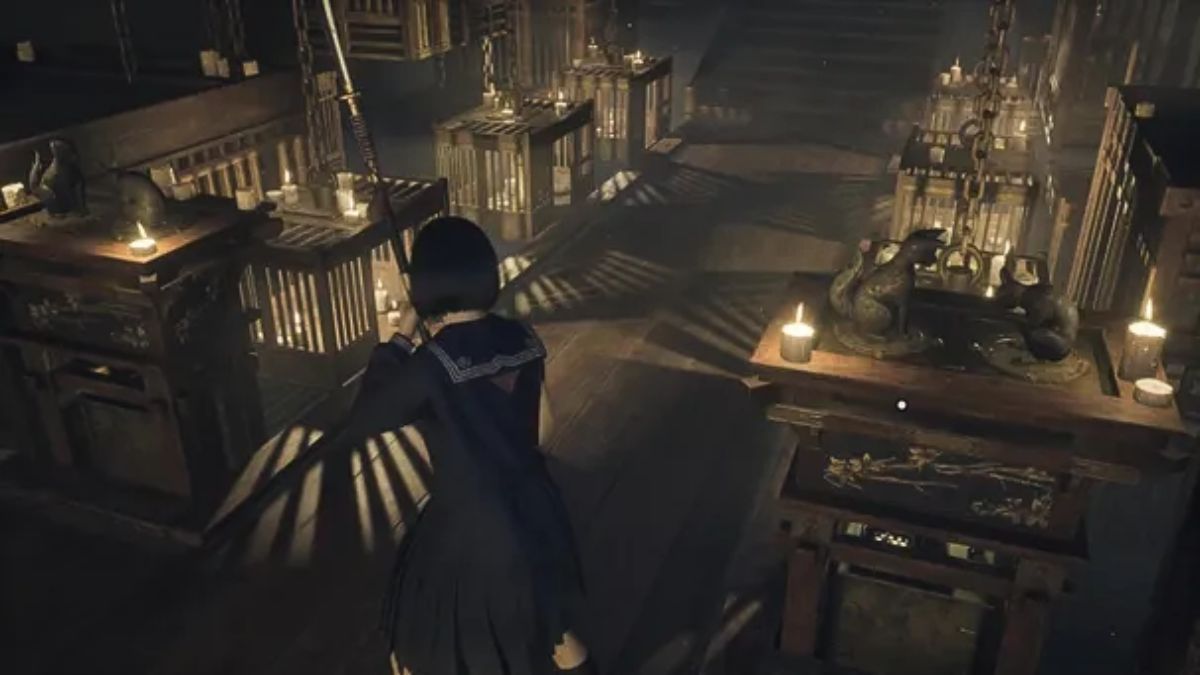
After escaping the haunted corridors of Middle School, Hinako descends into the Dark Shrine, where faith, memory, and decay intertwine. Inside the Worship Hall, she must solve two ritualistic puzzles before she can move forward.

The Light Puzzle is one of them, an intricate setup where two animal statues must be rotated correctly to balance the cages that hang like suspended prayers in a forgotten temple.
When aligned correctly, these statues release lampshades that are then used to uncover the White Rabbit Emblem Key, unlocking the next path toward the truth.
Light Puzzle Location – Dark Shrine Worship Hall (Eastern Chamber)
| Area | Location Description | Objective |
| Dark Shrine | Worship Hall (Eastern Chamber) | Align the Fox and Rabbit statues to lower the cages and retrieve the lampshades. |
To reach the puzzle:
- From the central door in the Worship Hall, turn right.
- Pass through the lantern-lit hallway, where whispers echo faintly.
- You’ll encounter Sakuko’s memory trapped behind a cell — approach the table before her to find a paper clue.
- Reading this note triggers the Light Puzzle.
This paper, cryptic yet emotional, hints at the direction each statue must face. But its meaning changes depending on the game’s difficulty setting.
Light Puzzle Solutions for All Difficulties
The statues’ positions vary across difficulties, representing the emotional tension between the two spirits — cunning (Fox) and innocence (Rabbit).
Here’s a breakdown of the exact directions you’ll need to turn each statue toward.
(Note: Directions are written as if Hinako is facing away from Sakuko’s cell.)
Story Mode (Easy)
| Side | Statue | Direction | Symbolism |
| Left | Fox | Right (East) | Seeking harmony; Fox faces the Rabbit. |
| Right | Rabbit | Left (West) | Mirrors the Fox’s gaze; symbolizes mutual understanding. |

Interpretation:
In Story Mode, both statues face each other. This balanced configuration reflects unity and reconciliation — fitting for a mode that eases players into the world’s logic while honoring its emotional core.

Hard Mode
| Side | Statue | Direction | Symbolism |
| Left | Fox | Left (West) | Turns away from the Rabbit; rejects harmony. |
| Right | Rabbit | Right (East) | Mirrors the rejection; both now divided. |

Interpretation:
Both statues face away — an echo of denial and separation. Hard Mode’s configuration is a direct metaphor for Hinako’s internal conflict, where clarity must be earned through struggle rather than balance.
Lost in the Fog (Nightmare Mode)
| Side | Statue | Direction | Symbolism |
| Left | Fox | Left (West) | Resists change, clinging to darkness. |
| Left | Rabbit | Right (East) | Faces the Fox but cannot reach it. |
| Right | Fox | Left (West) | Follows the same stagnant gaze. |
| Right | Rabbit | Left (West) | Both on the right now face the same side — submission to illusion. |

Interpretation:
The left pair faces apart, while the right pair turns left together — a fragmented balance. It’s the most cryptic configuration, reflecting the “Lost in the Fog” difficulty’s theme: truth is distorted by memory, and light no longer reveals — it blinds.
Step-by-Step Completion Guide
| Step | Action | Outcome |
| 1 | Interact with both Fox and Rabbit statues to rotate them. | Adjust their facing directions based on your difficulty. |
| 2 | Listen for the mechanical click that signals correct alignment. | The room’s suspended cages lower to ground level. |
| 3 | Inspect the opened cages. | Obtain Restraint Lampshade and Talon Lampshade. |
| 4 | Return to Sakuko’s altar cell. | Cover the lanterns with both lampshades. |
| 5 | Witness the cutscene that follows. | Receive the White Rabbit Emblem Key. |
Puzzle Rewards and Next Objectives
| Reward | Description | Next Step |
| White Rabbit Emblem Key | Unlocks the right-hand Fox statue door in the main Worship Hall. | Grants access to the Western Chambers, which contain the next major puzzle and lore fragments. |

Once the key is obtained, head back to the central area of the Worship Hall. Use it on the right Fox statue door to open the way forward. The left statue remains locked until you collect another key later in the shrine.
Symbolism of the Fox and Rabbit
Silent Hill has always spoken in metaphors — and Silent Hill f continues that legacy.
- The Fox represents cunning, survival, and deception — a manipulator of light.
- The Rabbit embodies purity, fear, and vulnerability — forever drawn to the safety of the shadows.
The puzzle’s resolution — where both must either face or turn away — mirrors Hinako’s own battle between denial and acceptance.
Each configuration across difficulty levels subtly retells that story:
- Story Mode: Reconciliation and clarity.
- Hard Mode: Division and rejection.
- Lost in the Fog: Confusion and despair.
More Silent Hill f Guides:


Leave a Reply