
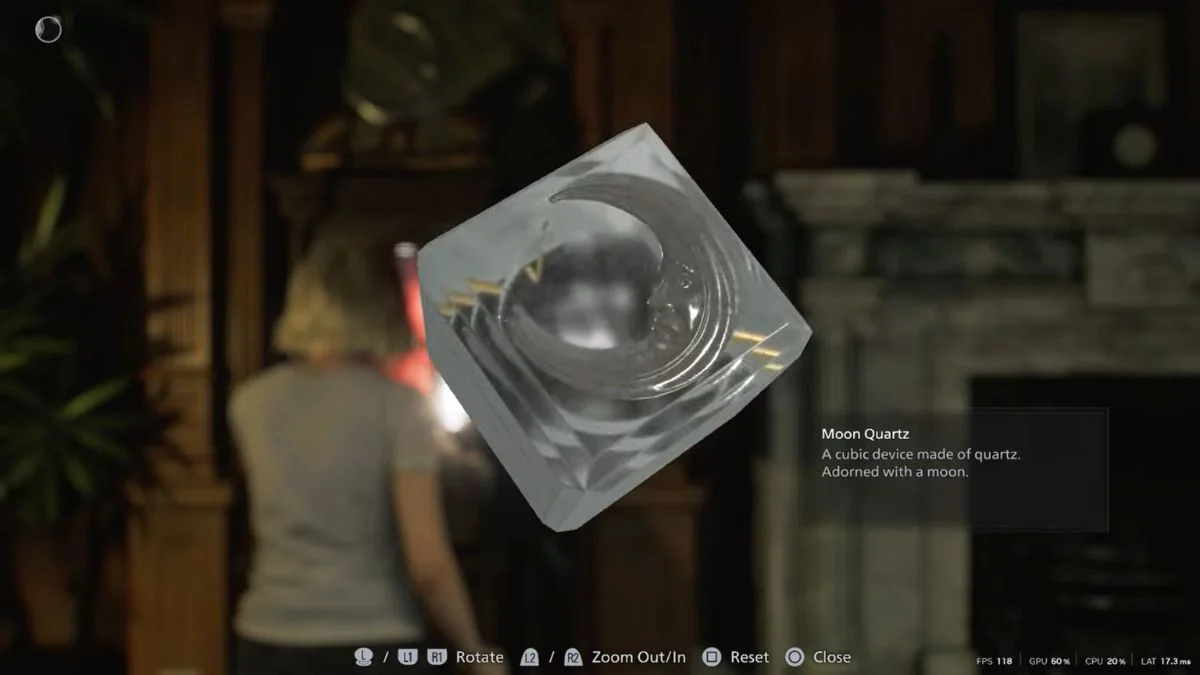
Early in Resident Evil Requiem, Grace arrives at the Central Hall of Rhodes Hill Care Center and encounters a door with three empty indentations, each labelled with one of three symbols: Moon, Sun, and Star. To open this door and progress through the story, you need to find three corresponding Quartz pieces. The first one, the Moon Quartz, sits locked inside a Puzzle Box in the Chairman’s Office.
The Chairman’s Office Puzzle is one of three Sun, Moon, and Star Puzzle Box challenges spread across Rhodes Hill Care Center, and solving it is a required step in the main story. However, the code is easy to miss if you skip reading the items around the office, so here is everything you need to know.
Key facts about the Chairman’s Office Puzzle:

- It sits on the second floor (2F) of the West Wing inside Rhodes Hill Care Center
- Solving it rewards you with the Moon Quartz, which slots into the Central Hall door
- The office also contains the Unicorn Trinket, which holds the Red Jewel needed to access the Parlor and, from there, the East Wing Keycard
- The Chairman’s Office Puzzle is the first of the three main Puzzle Box challenges in Rhodes Hill
- The code remains unchanged on Insanity Difficulty, however the Unicorn Trinket Box moves to the back table and a zombie guards it there
How To Reach The Chairman’s Office
Before you can solve the puzzle, you need to reach the West Wing and make your way upstairs to 2F. Here is the step-by-step path to get there:
Step 1: Get The West Wing Keycard
Head downstairs from the Guard’s Office in the Central Hall into the Medication Room. You will find the West Wing Keycard on a corpse there. Pick it up, as you need it to enter the West Wing at all.
Step 2: Pass Through The Kitchen
Use the West Wing Keycard to enter the West Wing, then head left toward the Kitchen, where a Zombie Chef roams. Aggravate the Zombie Chef so it strikes the cart in the room, which clears the way to the double doors on the opposite side. Pass through those doors to continue.
Pro tip: If you manage to kill the Zombie Chef, it drops a Pantry Key. Use it on the locked door in the Kitchen to collect extra supplies, including the Stakeout Takeout Charm.
Step 3: Make Your Way Upstairs To 2F
After leaving the Kitchen, continue through the Dining Room, past the Filling Room, and up the stairs near the door with the broken handwheel. On the upper floor, you will pass through the Bar and Lounge, where a singing zombie roams.
Worth noting: There are two singing zombies in Rhodes Hill, one here in the Bar and Lounge and one later in the Conference Room. Killing both unlocks the Deadly Duet Trophy and rewards Antique Coins, so it is worth hunting them both down.

After the Bar and Lounge, take a right turn and continue down the corridor until you spot a scale model of Rhodes Hill Care Center. The door directly opposite that model leads straight into the Chairman’s Office.

How To Find The Code For The Chairman’s Office Puzzle Box
Once inside the Chairman’s Office, you will notice a large Puzzle Box in the corner of the first seating area. It displays Sun, Star, and Moon symbols across three rotating panels and requires a four-symbol code to open. The code is hidden right there in the same room, and here is how to uncover it:
Step 1: Find The Pencil
Head to the very back of the Chairman’s Office and pick up the Pencil from the Chairman’s desk.
Step 2: Use The Pencil On The Notepad
Return to the coffee table in the seating area near the Puzzle Box. On the table sits a small notepad with a page torn out. Grace will comment that it looks indented. Use the Pencil on the notepad to shade the indented marks on the page, which reveals the Puzzle Box code written by the Chairman himself.

This is classic Resident Evil puzzle design at its best. The solution sits in plain sight and rewards you for taking the time to examine every item in the room rather than rushing straight to the device.
The Chairman’s Office Puzzle Box Solution
The Puzzle Box has three rotating panels: left (Star), middle (Sun), right (Moon). The code revealed by the Pencil and notepad method is:

Moon, Sun, Star, Moon
To input this correctly, rotate: right (Moon), middle (Sun), left (Star), right (Moon). Once you enter the correct sequence, the top of the Puzzle Box opens and reveals the Moon Quartz inside. Pick it up and add it to your inventory.
The Moon Quartz slots directly into the Moon indentation on the Central Hall door, bringing you one step closer to escaping Rhodes Hill Care Center.

What Else To Collect In The Chairman’s Office
The Chairman’s Office holds a second important item beyond the Moon Quartz, and you should pick it up before leaving the room.
Near the door you entered from, you will find the Unicorn Trinket Box. Interact with it, spin it around, and press the button on the rear to open it. Inside sits a Red Jewel.
The Red Jewel fits into an indent on a locked unicorn door back in the West Wing, the same one you likely walked past on your way to the Kitchen. Placing the Red Jewel there opens the Parlor, which serves two important purposes:
- You can exchange Antique Coins here for upgrades, including the Hip Pouch for extra inventory space
- A severed arm under a table near the bar holds the East Wing Keycard, which you need to continue the story and find the Sun Quartz in the Lead Researcher’s Office
Make sure you have both the Moon Quartz and the Red Jewel before heading back toward the Central Hall.

All Three Puzzle Box Solutions In Rhodes Hill Care Center
The Chairman’s Office Puzzle is just the beginning. Grace faces two more Puzzle Box challenges during her time in Rhodes Hill, and here is a complete overview of all three solutions to keep you on track:
Chairman’s Office Puzzle Box (West Wing, 2F)
Location: Second floor of the West Wing, opposite the Care Center scale model
Reward: Moon Quartz
Code: Moon, Sun, Star, Moon
How to find it: Use the Pencil from the Chairman’s desk on the torn notepad at the coffee table in the same room
Lead Researcher’s Office Puzzle Box (East Wing, 2F)
Location: Second floor of the East Wing. Note that this Puzzle Box has a padlock, so you first need to find the Corrosive from the Conference Room on the same floor and use it to melt the lock before entering the code
Reward: Sun Quartz and the Leatherbound Notebook, which contains the Organ Transport Box instructions and serves as an early hint toward the Final Puzzle
Code: Star, Sun, Moon, Sun

How to find it: Three photographs in the Lead Researcher’s Office each show the Puzzle Box in the background with some symbols visible. Combine all three photographs together and the full four-symbol code becomes clear
Security Manager’s Office Puzzle Box (East Wing, Isolation Ward)
Location: The Isolation Ward in the East Wing, accessed using the Security Level 2 Keycard obtained from the reanimated organless corpse in the Examination Room
Reward: Star Quartz
Code: Star, Star, Moon, Sun

How to find it: A journal on the Security Manager’s desk reveals the code. However, the Puzzle Box itself uses braille, which Grace cannot read. You need to carry Emily from the Medication Room all the way to the Security Manager’s Office so she can input the solution herself
Quick Step Reference: Getting The Moon Quartz
Here is a shortsummary of every confirmed step needed to solve the Chairman’s Office Puzzle and claim the Moon Quartz:
- Collect the West Wing Keycard from the corpse in the Medication Room below the Guard’s Office
- Use the Keycard to enter the West Wing
- Pass through the Kitchen by baiting the Zombie Chef into hitting the cart
- Use the Pantry Key dropped by the Zombie Chef to unlock the Pantry door and collect the Stakeout Takeout Charm
- Continue through the Dining Room and Filling Room, then head upstairs to 2F
- Pass through the Bar and Lounge and kill both singing zombies for the Deadly Duet Trophy
- Follow the corridor until you see the Care Center scale model
- Enter the Chairman’s Office through the door opposite the model
- Pick up the Pencil from the back of the Chairman’s desk
- Use the Pencil on the torn notepad at the coffee table to reveal the code
- Enter Moon, Sun, Star, Moon (right, middle, left, right) into the Puzzle Box
- Collect the Moon Quartz
- Pick up the Unicorn Trinket Box near the entrance door and open it to get the Red Jewel
- Use the Red Jewel on the Unicorn Door in the West Wing to access the Parlor and collect the East Wing Keycard from the severed arm

Where The Moon, Sun, And Star Puzzle Fits Into The Story
The Moon, Sun, and Star Puzzle is one of the first major puzzle chains Resident Evil Requiem introduces, and the clue for the entire thing is sitting in the Guard’s Office right at the start of the Rhodes Hill section. A pamphlet there, displayed beside portraits of three staff members, shows a symbol beside each name. It describes Chairman Mitchell Bennett, Lead Researcher Anthony Richardson, and Security Manager Luke Clarke, each associated with one of the three symbols. The pamphlet reads:
“Dignity of the moon, trust of the sun, serenity of the stars. We are partners.”
This tells you everything you need to know about the puzzle’s structure. Each symbol connects to a different office across the Care Center, which is exactly the path Grace follows. The Chairman owns the Moon, the Lead Researcher holds the Sun, and the Security Manager carries the Star.
Once you collect all three Quartz pieces and slot them into the Central Hall door, Grace exits into the courtyard of Rhodes Hill and continues her pursuit of Emily. The puzzle chain covers nearly the entire first act of Resident Evil Requiem and serves as the game’s central mechanical throughline for the Rhodes Hill section.


Leave a Reply