

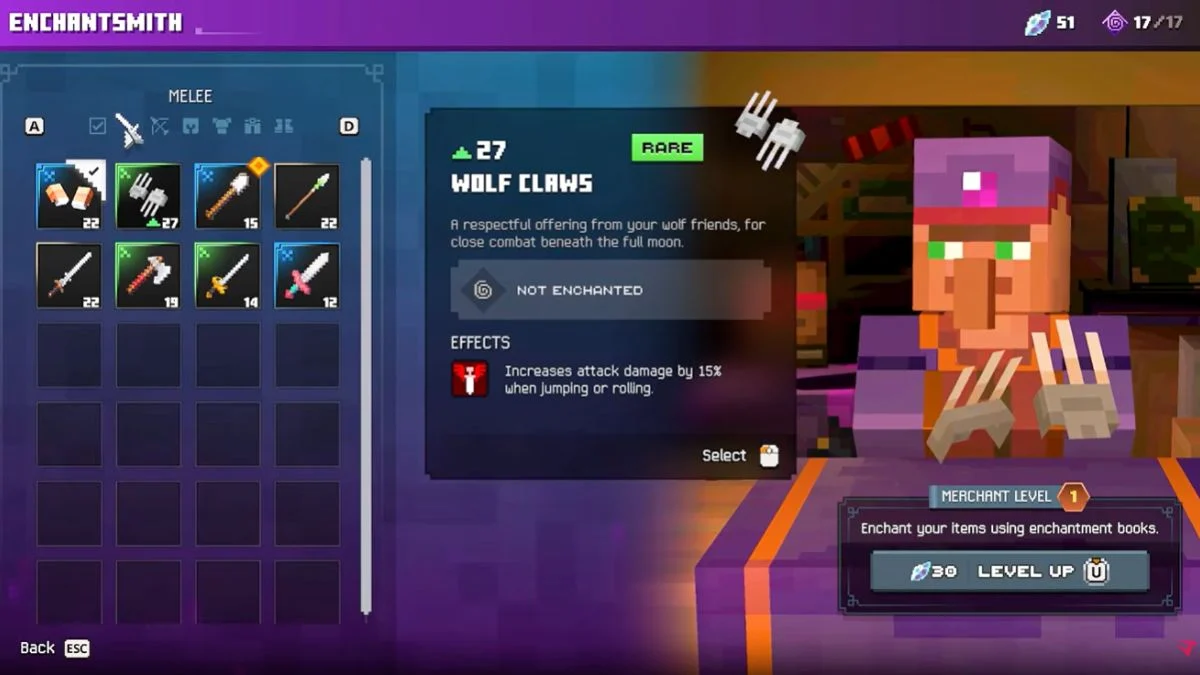
Minecraft Dungeons II eventually gives you a seriously useful way to customise your loot, but there is one catch: you cannot start enchanting immediately.
Before those Enchantment Books sitting in your inventory can actually do anything, you need to complete the Training with the Enchantsmith main quest. Once you finish it, the Enchantsmith becomes your go-to merchant for applying, upgrading and removing enchantments from compatible gear.
And honestly, this system is worth understanding before you start throwing resources at every shiny weapon you find.
Instead of relying entirely on random loot to give you the effects you want, Minecraft Dungeons II lets you build up a personal library of Enchantment Books and use those effects on eligible equipment. That gives you much more control over your build — but it also means Enchantment Points and Echo Shards are worth thinking about before you spend them.
Here is everything you need to know about unlocking enchanting, finding the stolen books, defeating the Evoker and getting the most out of the Enchantsmith.
How to Unlock Enchanting in Minecraft Dungeons II
The enchanting system unlocks after you complete the Training with the Enchantsmith main quest.
The quest becomes available after The Silence in Little Howl. The Enchantsmith asks you to recover three stolen Enchantment Books, eventually sending you into a dungeon where you must retrieve the final book and defeat an Evoker.
Once you complete that dungeon and return to the Enchantsmith, the enchanting system becomes available.
So, if you have already found an Enchantment Book but cannot use it yet, don’t panic. You haven’t missed a menu or broken anything. You simply haven’t completed the required Enchantsmith quest.
Minecraft Dungeons II’s Sign-In Error Has No Single Confirmed Fix:
Why does the problem trace back to your Microsoft account and Xbox services instead of your graphics settings, and why should a reinstall come dead last? Work through all ten fixes in order in our Minecraft Dungeons II Error Code 0064 Fix: 10 Ways to Get Past the Login Failed Error guide.
Training with the Enchantsmith: Every Quest Step
After completing The Silence in Little Howl, find the Enchantsmith in Little Howl and speak to him.

Your objective is to recover three stolen books:
- Healing Smite
- Piercing
- Ancient Alchemy
The first two are fairly straightforward. Ancient Alchemy is where the quest starts getting more interesting.
Follow the active quest marker rather than trying to explore every possible route yourself. The game guides you through the required areas.
Find the Book of Healing Smite
Your first target is the Book of Healing Smite.
Leave Little Howl by travelling south, then follow the route around toward the western side of the area. Eventually, you will reach the enemies guarding the book.
Clear the enemies, interact with the book and collect it.
Once you’ve got Healing Smite, the quest sends you toward the next stolen book.
Silent Hill: Townfall Hides Five Codes Across CEG Headquarters:
How does Richard restore power in a distorted office tower, and which six-slide agenda order finally opens the way to the top floor? Get every code and the full slide order in our Silent Hill: Townfall Part 5 Richard Walkthrough: CEG HQ, All Codes, Projector Puzzle & 10F walkthrough.
Find the Book of Piercing
Next up is the Book of Piercing.
Continue south from the previous area and cross the short bridge leading toward the book.
Interact with it when you arrive. Be ready for an enemy group to spawn after you collect it, so clear the encounter before moving on.
This section is relatively simple, so there is no real reason to burn through your strongest resources just to rush it. Follow the quest marker and save your attention for the dungeon waiting later.
Ancient Alchemy: Where the Quest Changes
The third book, Ancient Alchemy, isn’t simply sitting in an obvious location.
Follow the marked route until you find the mechanism controlling the drawbridge. Look for the button displaying the blue square symbol and activate it to lower the bridge.
Cross over and continue toward the wishing well.
Interact with the wishing well to descend.
At the top of the stairs below, you will find a lectern — but there is a problem.
The lectern is empty.
That’s intentional.
An enemy ambush follows, so defeat the attackers and then return to the Enchantsmith as the quest instructs.
Don’t waste time searching the surrounding area for another copy of Ancient Alchemy. The missing book becomes part of the next stage of the quest.
Follow the Enchantsmith to Brave Haven
After you report back, the Enchantsmith moves toward Brave Haven.
Follow him there and visit his stall.
At this point, you might expect the enchanting menu to finally open.
Not yet.
The Enchantsmith still needs that final stolen book, so he sends you toward a dungeon accessed through Honeycomb Fields.
Enter the dungeon and follow its route to continue the search.
Find the Hidden Dungeon Mechanisms
While exploring the dungeon, keep your eyes open for interactable floor slabs with chests underneath them.
They’re easy to overlook when you’re focused entirely on the main route.
Keep exploring until you reach the area containing the missing Book of Ancient Alchemy.
Interact with the book.
And get ready for a fight.
How to Defeat the Evoker
Taking the Ancient Alchemy book triggers an encounter with an Evoker.
The biggest mistake here is standing still.
The Evoker can summon Vexes and use fang attacks that cover areas around you. Keep moving, use ranged attacks when dealing with the Vexes, and use your roll to escape dangerous attack zones.
Watch the ground, avoid getting surrounded and create distance whenever you can.
Once the Evoker goes down, interact with the chest behind the book’s plinth.
You will receive two additional Enchantment Books:
- Shockwave
- Shadowcloak
Now leave the dungeon and return to the Enchantsmith.
Speak with him again and the enchanting system is finally unlocked.
Where to Find the Enchantsmith
Once enchanting is unlocked, the Enchantsmith becomes your main destination for modifying your gear.
The early Enchantsmith is available in Brave Haven, while additional Enchantsmith locations become available as you progress.
Current game data lists Enchantsmith locations including:
- Brave Haven
- Little Howl Hamlet
- Woodcutter’s Outpost
- Frozen Fortress
- Puddle Pond
For the early game, though, Brave Haven is the location you need to remember.
How to Enchant Gear
Once you reach the Enchantsmith, actually enchanting your equipment is pretty simple.

1. Choose Your Gear
Interact with the Enchantsmith to open the enchanting interface.
Your available equipment is divided into categories. The first section displays your currently equipped gear, while the other equipment tabs let you choose different items.
2. Select an Item
Choose the weapon, armor or other eligible equipment you want to improve.
The game will show which enchantments can be applied to that particular item.
This matters because not every enchantment works with every type of gear. Your choices depend on both the Enchantment Books in your library and the equipment you have selected.
3. Choose an Enchantment
Select the Enchantment Book you want to use.
Before confirming anything, check:
- What the enchantment does
- Which tier you are purchasing
- How many Enchantment Points it costs
- How many Echo Shards it requires
- Whether the effect actually complements your gear and playstyle
Don’t just click the biggest-looking upgrade because you can afford it.
4. Spend Enchantment Points and Echo Shards
Enchanting requires Enchantment Points and Echo Shards.
Enchantment Points are tied to character progression, while Echo Shards are a separate resource used by the enchanting and vendor systems.
If you don’t have enough of either resource, you cannot confirm the enchantment.
5. Confirm the Enchantment
Once you’ve selected the effect and have enough resources, choose Enchant.
The effect is then applied to the item.
Minecraft’s official explanation of the system describes Enchantment Books as being stored in your personal library and used through the Enchantsmith on compatible gear, giving you greater control over your build.
What Are Enchantment Books?
Think of Enchantment Books as your collection of available enchantment effects.
When you discover a book, it is added to your personal library rather than functioning as a one-time item permanently tied to the gear you are currently carrying.
That changes how you should approach loot.
You can experiment with different builds without treating every Enchantment Book as something that has to be immediately spent.
The system is designed to give you more control over your equipment and the way your build develops.
Can You Reuse the Same Enchantment Book?
Yes.
Current game data indicates that an Enchantment Book remains available in your library after you apply it. That means you can use the same book on multiple eligible pieces of gear instead of permanently consuming it the first time you enchant something.
This is especially useful because you’re constantly replacing equipment during progression.
Your first enchanted sword or armor piece doesn’t have to become your permanent build just because you invested in it.
How to Upgrade Enchantments
The Enchantsmith can do more than apply an enchantment once.
You can also upgrade enchantments as you progress.
Current game data lists three enchantment tiers:
| Enchantment Tier | Enchantment Points | Echo Shards |
| Tier I | 3 | 1 |
| Tier II | 5 | 1 |
| Tier III | 7 | 1 |
Taking one enchantment from Tier I through Tier III therefore requires 15 Enchantment Points and 3 Echo Shards in total.
The exact value of an upgrade depends on the enchantment itself, so don’t automatically assume every effect needs to be pushed straight to Tier III.
How to Upgrade the Enchantsmith
You can upgrade the Enchantsmith itself too.
The early progression includes:
- Level 1: Basic enchanting
- Level 2: 30 Echo Shards
- Level 3: 60 Echo Shards
Higher Enchantsmith levels unlock stronger options for improving your enchantments.
But remember that Echo Shards have other uses. If you’re constantly replacing your gear, spending everything on the merchant immediately may not be the most useful way to manage your resources.
If you have equipment you expect to keep for several missions, investing in the Enchantsmith can make more sense.
Can You Remove an Enchantment?
Yes.
The Enchantsmith also provides a disenchant option when you select an enchanted item again.
Disenchanting removes the enchantment from the equipment while keeping the Enchantment Book available in your library. Current game data also indicates that the Enchantment Points spent on the enchantment are refunded.
That makes experimentation much less risky.
You aren’t permanently locking an Enchantment Book to the first piece of gear you use it on.
What Gear Should You Enchant First?
This is where patience can save you resources.
Early equipment gets replaced regularly. Spending a large amount of Enchantment Points on an item that you replace shortly afterward means you didn’t get much value from the investment.
Instead, look for equipment that:
- Fits your current playstyle
- Has useful base stats
- You expect to keep for several missions
- Already works well with the enchantment you want
- Is worth upgrading rather than immediately replacing
There isn’t one universally correct enchantment setup. Minecraft Dungeons II encourages build experimentation, so the right choice depends on your equipment and how you play.
Enchantsmith vs. Blacksmith: Don’t Mix Them Up
The two merchants handle different parts of your equipment progression.
Use the Enchantsmith when you want to:
- Apply an Enchantment Book
- Upgrade an enchantment
- Remove an enchantment
- Upgrade the Enchantsmith’s own level
The Blacksmith handles different equipment-related progression.
The easiest rule to remember is:
Changing the enchantment? Visit the Enchantsmith.
How to Get More Echo Shards
Running low on Echo Shards? Keep exploring.
Current game data lists Echo Shards from areas including:
- Honeycomb Fields
- Howling Woods
- The Deep Dark
- Frozen Highlands
- Rainy Plains
- Singer’s Meadow
- Humbler Huskland
- Ravines
- Lullaby Hills
- The Sift
They can also come from Deep Dark dungeons, various bosses, certain enemies, dungeon and rift chests, Soul Storm reward chests and an Overworld Echo Shard pot.
So, if you’re hunting for Echo Shards, don’t automatically sprint straight toward the main objective and ignore every side path.
Exploration can pay off.
The Best Early Enchanting Strategy
The biggest mistake you can make with the Enchantsmith is assuming that every new piece of gear deserves an immediate investment.
It doesn’t.
When the system first unlocks, those Enchantment Points and Echo Shards can feel like free upgrade currency. They aren’t.
Try an enchantment. See what it does for your build. Notice how long you actually keep the item equipped.
Then, once you find equipment that genuinely works with your playstyle, your resources become much more valuable.
The good news is that your Enchantment Books stay in your library. Unlocking an effect is therefore only the beginning. You can continue experimenting with that effect as better equipment enters your inventory.
Graveyard Keeper 2’s Best Firefly Source Regrows in About 25 Minutes:
Which Swamp plant guarantees a Firefly with every pick, and why does a bait recipe that eats four at a time make that route worth knowing? Find the farming route and the vendor backup in our Graveyard Keeper 2 Firefly Guide: Where to Find Fireflies and Farm Insect Bait post.
Minecraft Dungeons II Enchanting Checklist
Before spending your resources, run through this quick checklist:
- Complete Training with the Enchantsmith.
- Find the Enchantsmith in Brave Haven.
- Check the Enchantment Books in your library.
- Select the gear you actually want to improve.
- Check which enchantments are compatible.
- Review the Enchantment Point and Echo Shard cost.
- Decide whether the item is worth investing in.
- Apply the enchantment.
- Upgrade it later if the equipment remains useful.
- Disenchant it if the effect no longer fits your build.
Once you understand that loop, the Enchantsmith becomes much easier to use.
Instead of waiting for the perfect random drop, you can start shaping your equipment around the enchantment effects you’ve collected. That’s the real appeal of Minecraft Dungeons II’s enchanting system: your loot isn’t just something you find — it becomes something you can build around.
Disclaimer
Game systems and resource costs can change through patches and updates. This guide reflects the available Minecraft Dungeons II information checked on October 3, 2026, with official Minecraft information prioritised where available.
Image Credit:
- Featured Image: Mojang Studios / Double Eleven / Xbox Game Studios / YouTube @Jyku
- Image 2: Mojang Studios / Double Eleven / Xbox Game Studios / YouTube @Jyku
- Image 3: Mojang Studios / Double Eleven / Xbox Game Studios / YouTube @Jyku


Leave a Reply