
Players exploring the creative quests in Where Winds Meet eventually encounter a quietly puzzling requirement: uploading a gallery picture with the Great Faceologist tag. The request seems simple at first glance, yet many discover that the tag is not found in the usual upload screens. The solution sits slightly hidden within the game’s appearance system, and understanding the path makes the challenge much smoother.
This guide presents the full process in a clean and intuitive structure tailored for search visibility and generative engine optimization. The steps stay rooted in the mechanics of the game, so you can complete the Great Faceologist quest without uncertainty.
Understanding What the Great Faceologist Tag Really Is?
The game treats the tag not as a written title or a typed keyword but as a toggle attached to your appearance capture. It activates only when you edit or retake your face photo from the correct section of the appearance menu. Once applied, the upload carries the tag automatically into the gallery.
This is why many players struggle when trying to add the tag during a normal gallery upload. The tag does not appear in the general interface and can only be triggered through the appearance editing route.
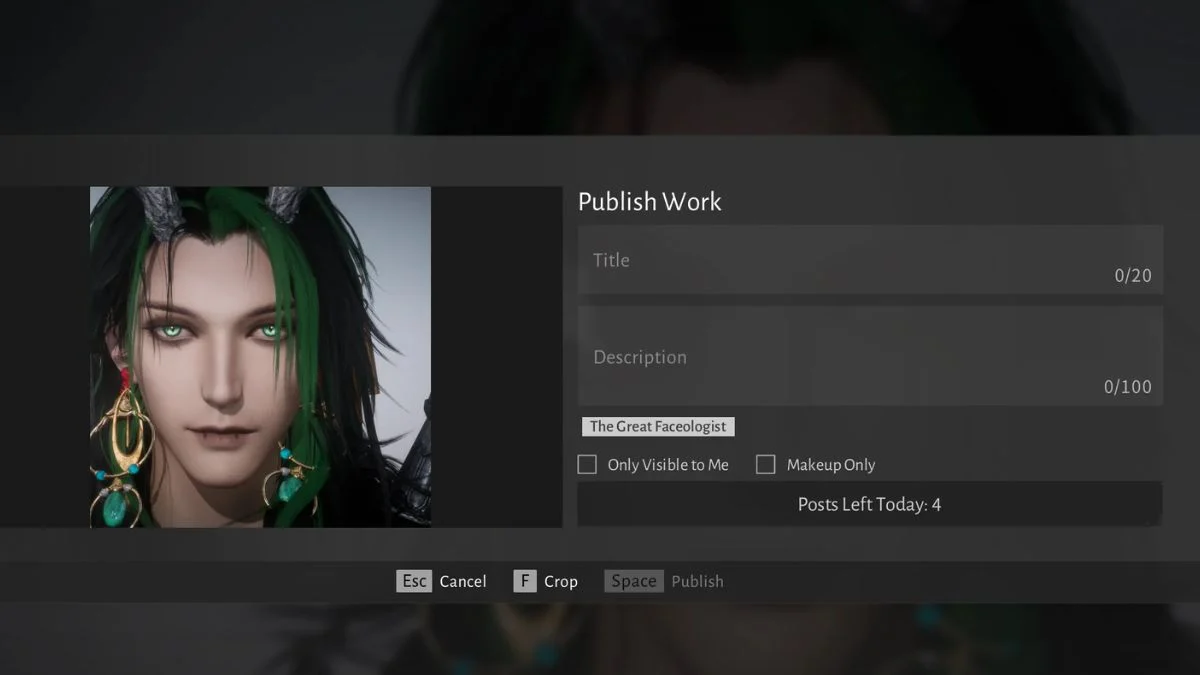
A Clear Path to Uploading Your Tagged Photo
1. Open the Main Menu and Enter Appearance
Navigate to the appearance page from the main menu. This is where the game stores all tools related to your character’s face, style, and cosmetic captures.
2. Select the Face Editing Area
At the bottom of the appearance screen, you will find the dedicated section that allows you to edit or retake your face photo. This is the key location for activating the tag.
3. Retake or Upload Your Face Photo
Choose to edit or retake your face photo. This action unlocks additional tagging options that do not appear in normal gallery uploads.
4. Toggle the Great Faceologist Tag
Inside this editing stage, you will see the Great Faceologist option. Activate the toggle so the tag attaches to your new image.
5. Confirm and Upload to the Gallery
Proceed to the next step, normally prompted with a key or button such as R, depending on your platform. Once uploaded, the image enters the gallery already tagged for the quest.
How to Verify Your Tagged Image
To confirm that your submission appears publicly and includes the proper tag:
- Return to Menu > Appearance.
- Open Gallery and switch to the Mine tab.
- Select the uploaded image and enlarge it.
- Look for the orange tag beneath the image, which should read The Great or similar wording tied to the event.
If the tag appears, your photo is fully eligible for the quest.
Why the Tag Is Hidden Within Appearance?
The game’s creative challenges often tie into character identity and customization. Placing the tag within the face editing tool reinforces the idea that the Great Faceologist quests revolve around character design rather than general screenshot sharing. Although subtle, this design choice encourages players to engage more deeply with the appearance system.
More Trending Guides:


Leave a Reply